


- Joined
- Jan 25, 2013
- Messages
- 1,502
- Reaction score
- 255
Got done with mine today, in total about a 3-4 hour job to do it well, assuming you can recoat the existing wing walk material. Shoddy, if you don't care how it looks, probably an hour and a half.
Anyways, here's the stuff....
http://www.aircraftdoorseals.com/product/beech-19-series/ultra-wing-walk/
In effect, this is very similar, if not the same, as the xylene based paint that they paint metal roofing with, if you're familiar with that stuff. Only difference being it has rubber pellets immersed in it to give it the rough texture.
Per ADS, it will stick fine to factory coatings, I had no trouble with it sticking to the factory coating on my Dakota. If you have a tape rather than a coating, that's another story, the adhesion will only be as good as the tape, obviously, and would probably warrant a complete removal before painting the new stuff on. It sticks fine to the factory paint, as well, so bare spots are not a concern.
One can will give you two rather thick coats. If you're just recoating the old factory stuff, you'll only wind up using about half of the can. Either way, one can is more than enough to do one airplane.
You're gonna need...
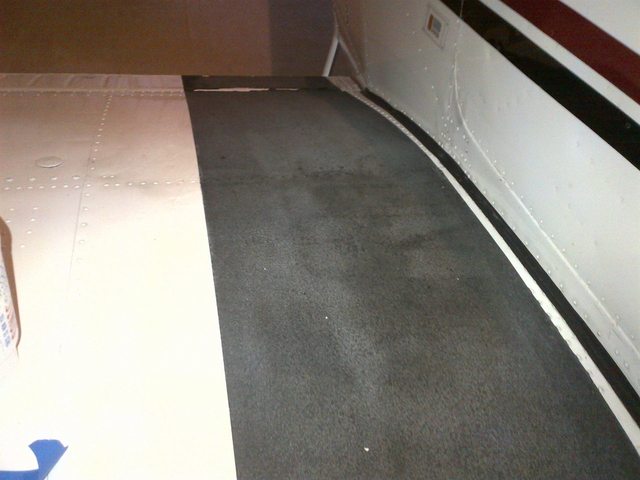
Clean the existing coating as thoroughly as possible and then a little more. The top crown of the wing tends to collect the most shoe grime, so it should stand out when it's dry. Tear loose pieces of the old coating off, obviously.
Here's a before, with shoe stains clearly visible on the top.
Once you've got it as clean as possible and you've let the water dry, tack the hell out of it. No matter what you used to clean with, the roughness of the existing coating is gonna tear up your cloth and fill the surface with lint. Tack cloth will pick it up and get rid of it, leaving you perfectly clean and ready to paint. The more you rub with the tack cloth the more it'll pick up, there's no overdoing it really.
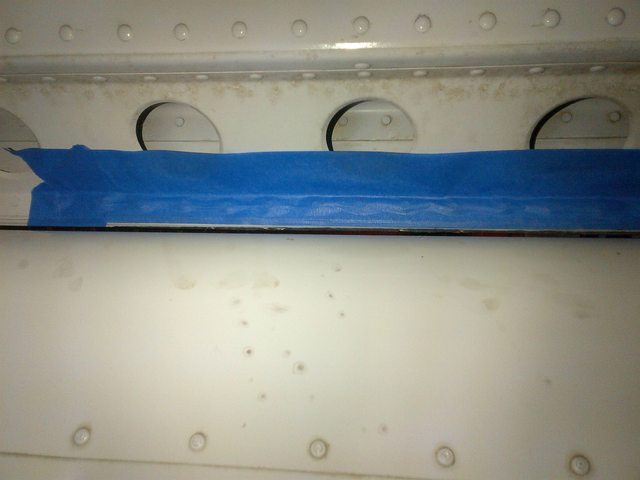
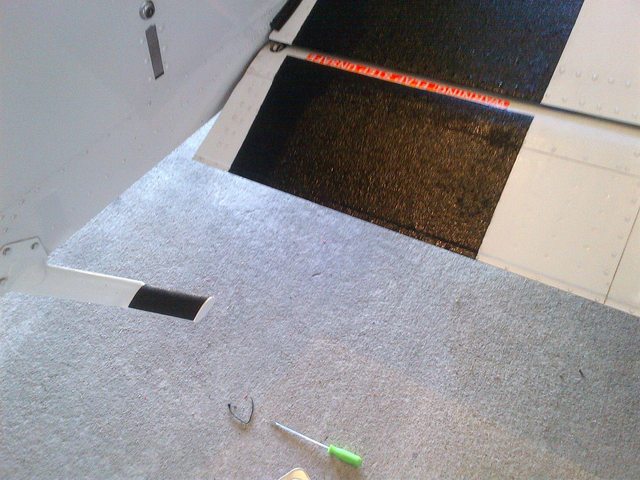
At this point, start masking. Around the area to be painted with tape, and with paper and tape another 4 feet or so onto the wing to give you a work surface for your paint tray, brush, can of thinner, etc.

You'll also need to crawl underneath and mask the edge where you want it to stop, otherwise it will run/drip under the wing and flap...
Under the flap..

Under the wing..
You'll have to extend the flap to tape the top edge.
You can't reliably paint the gap between flap and wing with the flap all the way up, and if you set it too far down the paint will run/drip. 10 degrees will leave it close enough to level for the paint to cling without runs, and give you access to the sticker and top edge of the flap for cleanup later, so after you're done masking leave the flap at the first notch.
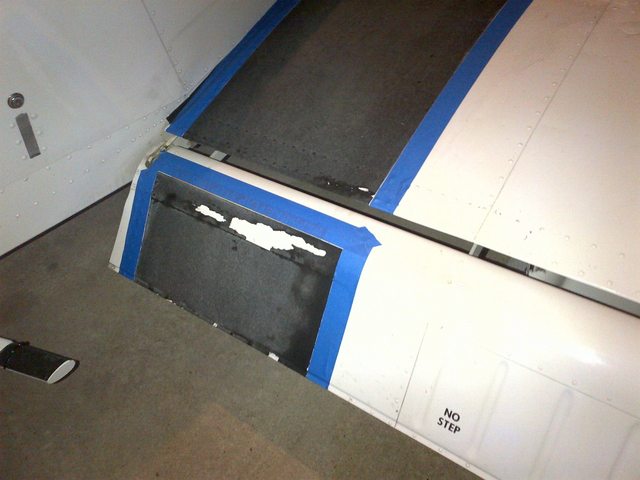
If you're doing the step, you'll also need to tape it off, obviously.
When you're done masking, go back around a second time, pressing the edges where you want the paint to stop to make sure they're down. The more meticulous the tape, the less touch up later.
Stir the paint and fill your tray with about half of the can, and roll it on slowly. If you try to roll too fast you'll sling it everywhere, and what doesn't wind up on the other parts of the plane nearby will wind up on you. This stuff is about as thick as molasses, so you can't work it fast. Once you're done rolling it on, pull the tape while it's still wet, don't wait on it to dry or it'll glue the tape to the plane.
And even if you are meticulous with the tape, you'll still have some runs to clean up, with the worst likely being around any adjacent rivets that were hard to tape flush, like so...
Not the end of the world, you just have to feather them back in while the paint is wet. At this point you've got about an hour to an hour and 15, at 70 degrees F, before the paint starts to cure to the point of being hard to work. Cooler temps a bit longer, warmer temps a bit less. So there's no real rush, just pick a starting spot and start going from run/drip to run/drip and feathering them back into the painted area.
How to do so?
1) Take one of your clean rags, and wrap a spot around your finger, wet it slightly with your xylene.
2) Pick a run/drip spot, and work the excess that you want to remove back in toward the painted area. Don't wipe away from the paint, you'll only make it worse and smear it more.
3) When you touch the painted area that spot on your rag is ruined, if you keep using that same spot it'll just make more smears. Move to a new clean spot on your rag, dab your new clean spot with xylene, and repeat, again always working toward the painted area, never away from it.
4) Repeat until the run/drip is gone, and any smudge is gone, then move on to the next run/drip with another new clean spot on the rag.
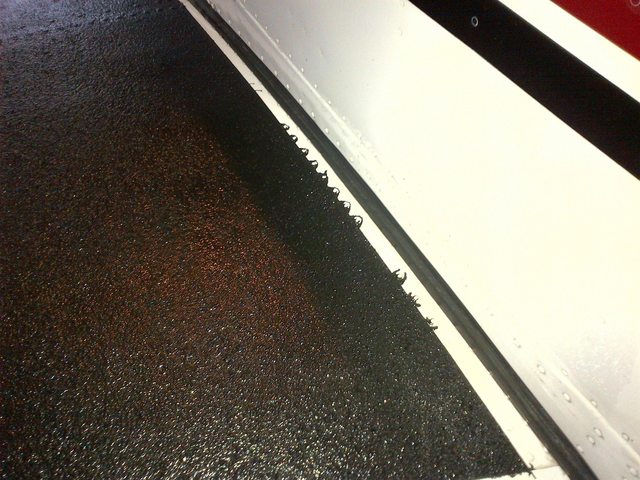
When you're done working your runs back into a clean edge all the way around, you should have pretty clean results, like so...
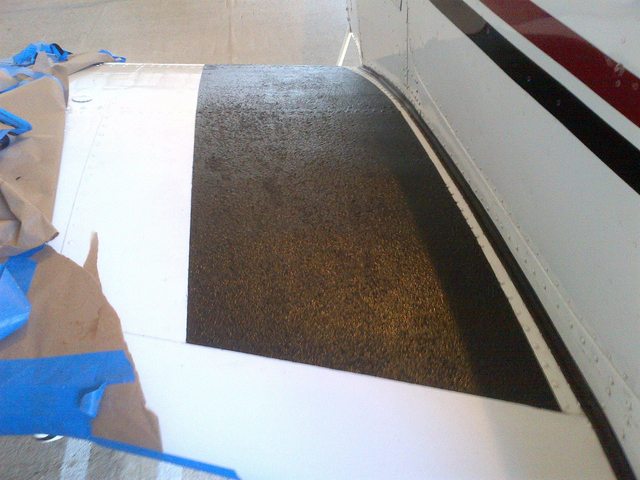
The paint does a pretty good job of hiding unlevel spots on its own. As you can see I started with some spots that were worn completely bare. I worked a little extra paint into them in the one coat, but are they perfectly level? No. A second coat would probably get them a lot closer, but I can barely see them even knowing where they are, so I don't think I'll bother, unless they show a lot more when this stuff is completely cured.
As you go around you'll probably notice bare spots here and there, I was able to touch up bare spots with a brush throughout the 1 hour tack time on the paint without any issues, as I went around feathering in the edges.
If you have no large bare spots like I did, one coat will surely be enough for the entire job.
Anyways, here's the stuff....
http://www.aircraftdoorseals.com/product/beech-19-series/ultra-wing-walk/
In effect, this is very similar, if not the same, as the xylene based paint that they paint metal roofing with, if you're familiar with that stuff. Only difference being it has rubber pellets immersed in it to give it the rough texture.
Per ADS, it will stick fine to factory coatings, I had no trouble with it sticking to the factory coating on my Dakota. If you have a tape rather than a coating, that's another story, the adhesion will only be as good as the tape, obviously, and would probably warrant a complete removal before painting the new stuff on. It sticks fine to the factory paint, as well, so bare spots are not a concern.
One can will give you two rather thick coats. If you're just recoating the old factory stuff, you'll only wind up using about half of the can. Either way, one can is more than enough to do one airplane.
You're gonna need...
- The wing walk paint
- 6" paint roller and a metal paint tray
- A small paint brush
- Some paint store rags (preferably that don't shed much, I used Sherwin Williams "Tuff Rags")
- Some residue-free cleaner (I used Goo-Be-Gone)
- A can of xylene
- Tack cloth
- Blue painter's tape (one roll 1", one roll 3" or whatever 'wide' width you prefer)
- Masking paper
- Some water to clean up with
Clean the existing coating as thoroughly as possible and then a little more. The top crown of the wing tends to collect the most shoe grime, so it should stand out when it's dry. Tear loose pieces of the old coating off, obviously.
Here's a before, with shoe stains clearly visible on the top.
Once you've got it as clean as possible and you've let the water dry, tack the hell out of it. No matter what you used to clean with, the roughness of the existing coating is gonna tear up your cloth and fill the surface with lint. Tack cloth will pick it up and get rid of it, leaving you perfectly clean and ready to paint. The more you rub with the tack cloth the more it'll pick up, there's no overdoing it really.
At this point, start masking. Around the area to be painted with tape, and with paper and tape another 4 feet or so onto the wing to give you a work surface for your paint tray, brush, can of thinner, etc.
You'll also need to crawl underneath and mask the edge where you want it to stop, otherwise it will run/drip under the wing and flap...
Under the flap..
Under the wing..
You'll have to extend the flap to tape the top edge.
You can't reliably paint the gap between flap and wing with the flap all the way up, and if you set it too far down the paint will run/drip. 10 degrees will leave it close enough to level for the paint to cling without runs, and give you access to the sticker and top edge of the flap for cleanup later, so after you're done masking leave the flap at the first notch.
If you're doing the step, you'll also need to tape it off, obviously.
When you're done masking, go back around a second time, pressing the edges where you want the paint to stop to make sure they're down. The more meticulous the tape, the less touch up later.
Stir the paint and fill your tray with about half of the can, and roll it on slowly. If you try to roll too fast you'll sling it everywhere, and what doesn't wind up on the other parts of the plane nearby will wind up on you. This stuff is about as thick as molasses, so you can't work it fast. Once you're done rolling it on, pull the tape while it's still wet, don't wait on it to dry or it'll glue the tape to the plane.
And even if you are meticulous with the tape, you'll still have some runs to clean up, with the worst likely being around any adjacent rivets that were hard to tape flush, like so...
Not the end of the world, you just have to feather them back in while the paint is wet. At this point you've got about an hour to an hour and 15, at 70 degrees F, before the paint starts to cure to the point of being hard to work. Cooler temps a bit longer, warmer temps a bit less. So there's no real rush, just pick a starting spot and start going from run/drip to run/drip and feathering them back into the painted area.
How to do so?
1) Take one of your clean rags, and wrap a spot around your finger, wet it slightly with your xylene.
2) Pick a run/drip spot, and work the excess that you want to remove back in toward the painted area. Don't wipe away from the paint, you'll only make it worse and smear it more.
3) When you touch the painted area that spot on your rag is ruined, if you keep using that same spot it'll just make more smears. Move to a new clean spot on your rag, dab your new clean spot with xylene, and repeat, again always working toward the painted area, never away from it.
4) Repeat until the run/drip is gone, and any smudge is gone, then move on to the next run/drip with another new clean spot on the rag.
When you're done working your runs back into a clean edge all the way around, you should have pretty clean results, like so...
The paint does a pretty good job of hiding unlevel spots on its own. As you can see I started with some spots that were worn completely bare. I worked a little extra paint into them in the one coat, but are they perfectly level? No. A second coat would probably get them a lot closer, but I can barely see them even knowing where they are, so I don't think I'll bother, unless they show a lot more when this stuff is completely cured.
As you go around you'll probably notice bare spots here and there, I was able to touch up bare spots with a brush throughout the 1 hour tack time on the paint without any issues, as I went around feathering in the edges.
If you have no large bare spots like I did, one coat will surely be enough for the entire job.
Last edited: