- Joined
- Feb 15, 2012
- Messages
- 9,567
- Reaction score
- 4,408
There is some interest on the board here about after market shoulder restraints. I put in "4-point" (actually 3-point with a Y shoulder) front seat restraints in June 2011.
Got the STC'd product from BAS, they use industry standard Amsafe mechanisms. I loved them initially, and still find them top notch. They have worn well, and remain comfortable and secure. Highly recommend them.
http://basinc-aeromod.com/piper.php
The full (old) post is below. Since then I've had the interior redone, so the old headliner holes (and gaudy orange velor!) are gone, and not an issue any longer.
* Orest
=========================================================
Well, got it done last week. It was a chore for sure, but the fruit of the labor is very heartily being enjoyed now.
Really didn't want to to drill/cut/maim the fabric or aluminum incorrectly, so we went slowly and carefully. That is not to say that the diagrams and text were lacking, they were pretty complete, but measure twice, thrice or more, and then cut.
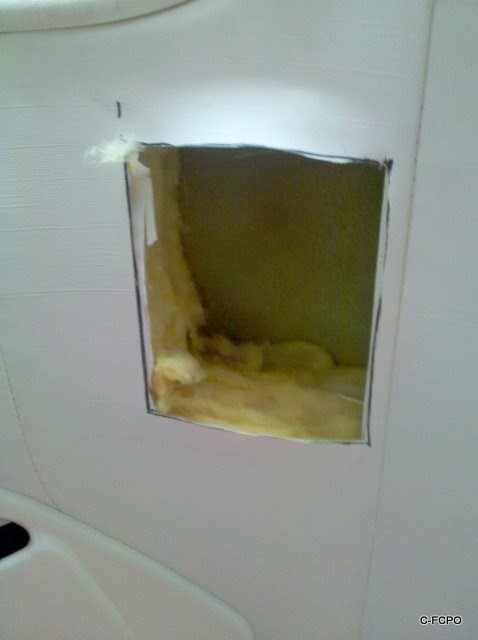
The first cut in the headliner, and the insulation excised to make room for the retension spool. 
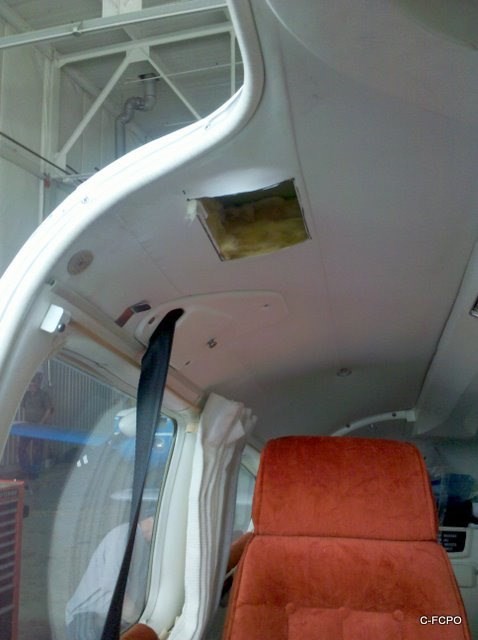
I really cringed to see the ugly hole in the otherwise spotless headliner, but nice to see the healthy aluminum underneath.
The next step is to make room for, and then rivet in the vertical plate that will hold and anchor the horizontal plate that will actually support the mechanism.
On the co-pilot's side there are two rivets that have to be removed in the "C" channel, they are exactly in the way. Two holes are then drilled into the bottom of the C channel, and the vertical plate temporarily fixed with the screws against the riser portion of the C channel. Then you need a 90* drill (you really do!) to make the holes for the rivets.
Looking forward into the opening, this step now 2/3rds complete.
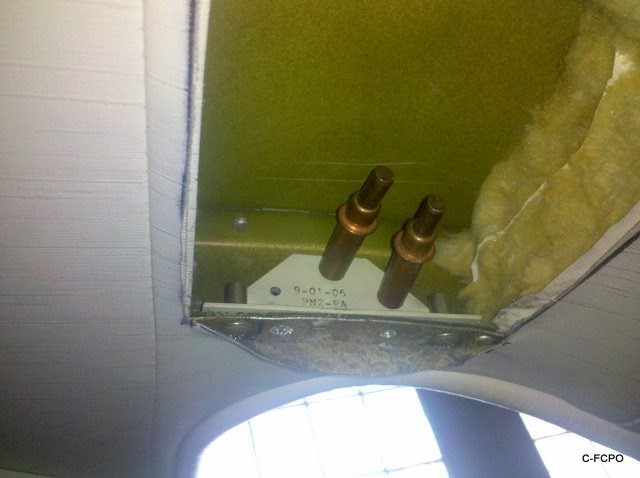
And done.
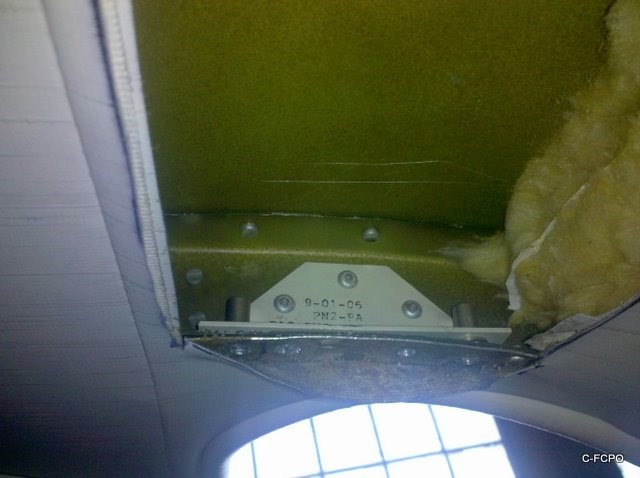
A closer look.
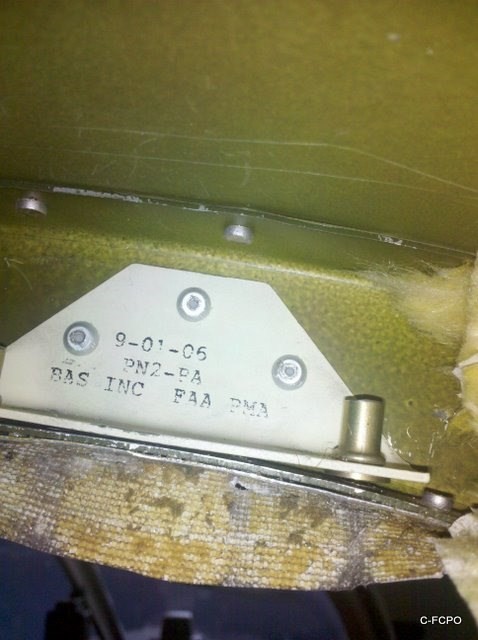
The next step is really the hardest and most frustrating. You have to blindly fish a long flat rod through the insulation above the headliner, in our case past an extra strengthening beam as well, and then catch it with a screw screwed in from the outside through an opened up rivet hole.
Removing the rivet was fairly easy, but it says to use a rivet hole 4" in from the outside beam. It seemed more logical to use the one 2" in, as it was directly in line with the seatbelt mechanism. We did as directed though, and I think the reason for this slight angle is so the vector force is directly parallel to the line made by your body, the mechanism, and the anchoring point.
It says to fish the rod in and use a magnet to hold and move it into position. We wasted an hour fiddling with this, my suggestion, don't bother! We finally decided to cut a neat hole in the pristine headliner (oh!), but it made that step much easier. I suppose if your aircraft does not have any insulation, and does not have the extra beam in between, that might have worked, but otherwise it is a real bear.
Did about a 3" T-cut, and then taped the flaps back. Here is looking aft, into the opening, the rod in place, the insulation compacted, rivet-nut ready to accept the screw passed in through the fuselage rivet opening above.
The rod is temporarily anchored in.
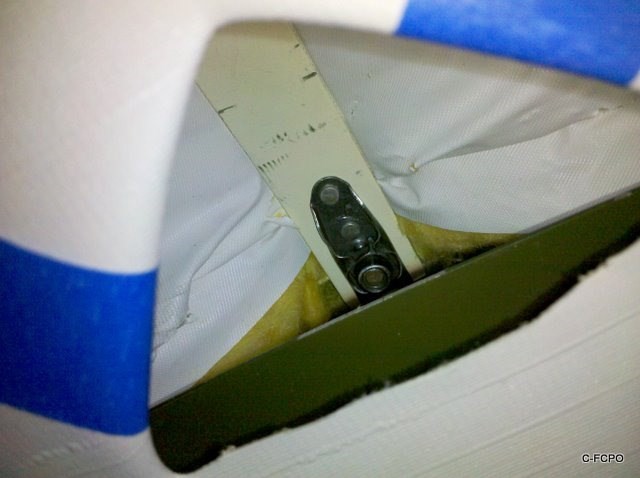
Back to the front, the horizontal plate is screwed into place so that you can measure and drill a hole in the rod exactly to size.
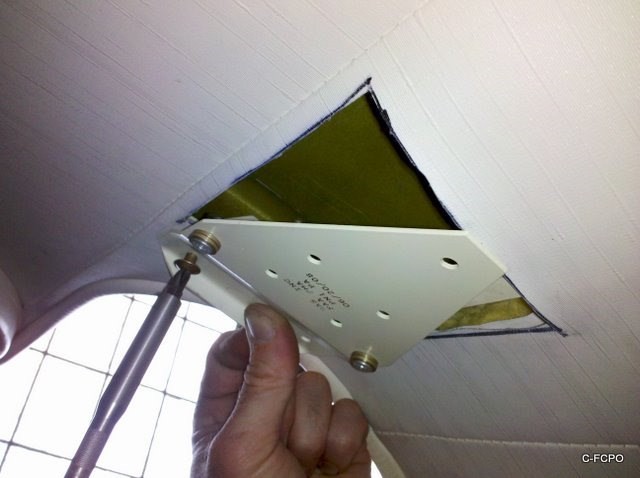
Now with that hole drilled, and the rod back in place, and the mechanism mounted on the plate.
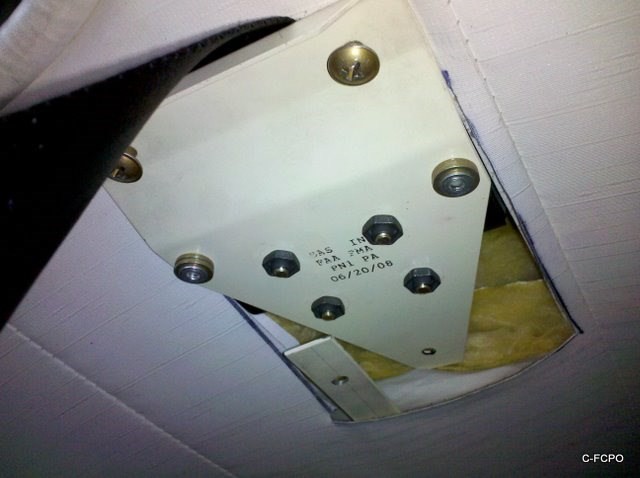
We forgot one step, to place the plastic top plate to protect the headliner from friction from the belt, corrected that later.
One other issue, the pre-drilled holes in the plate were extremely difficult to thread the screws through even after the enlargement suggested. We gingerly opened them up a bit more, but not so much that the screws would not be firmly held. I suppose the tight fit keeps them from backing out.
One of the two screw holes in question.
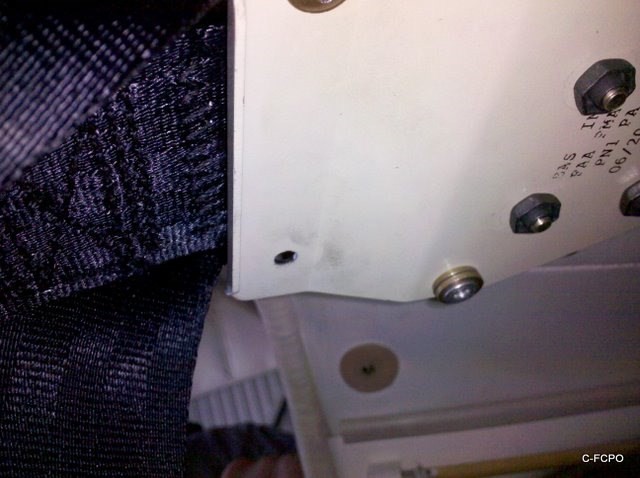
The anchoring screw from the outside, once finally secured, we sealed with some compound to waterproof it. Also sealed the original anchoring screw, after screwing it back in, that held the OEM shoulder belts in place -- after removing those.
Ta da! One side done.
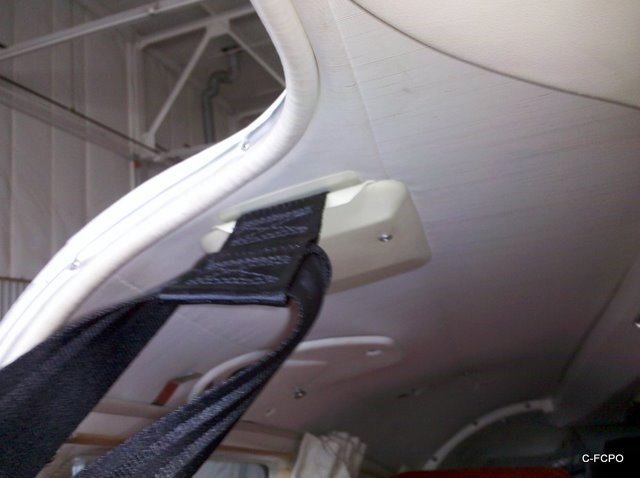
The first side took us some six hours. A lot of that was scratching our heads a bit, and rereading things, mostly just plodding.
But, armed with that experience, the pilot's side took only 1-1/2 hrs!
The claims of a two hour install for a naive installer is not creditable, but I can see that someone with an install or two under their belt, could well complete the full job in 2 to 3 hrs.
The pilot's side had a couple of extra nuisances.
Although there were no rivets to remove in the C channel on the pilot's side, there was a bundle of wires exactly in the wrong place.
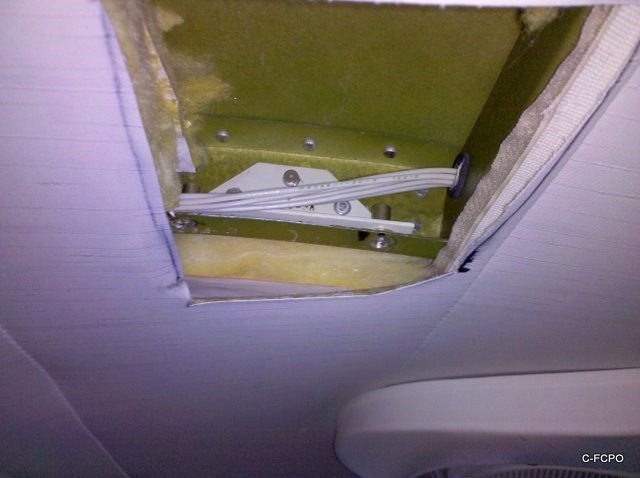
We just cut those wires and pushed them aside -- NOT!
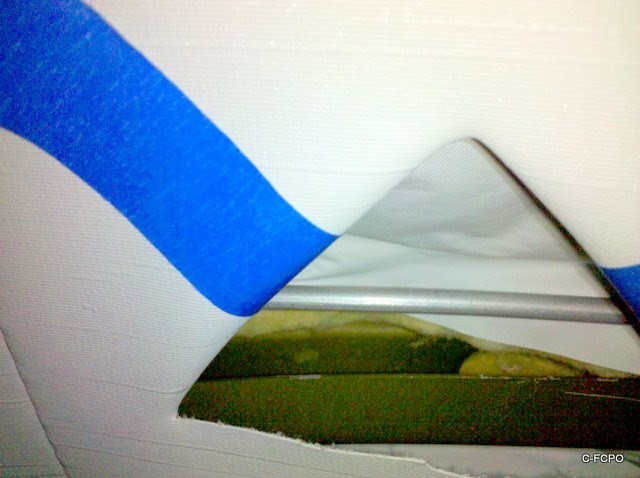
The second issue and obstruction was a small aluminum tube, the purpose of which I don't know, but it may be a protection/guide for some antenna wires.
It was exactly in the "wrong place" as well, made maneuvering the rod into place in the rear, and mating it to the roof top screw a devil of a task, even with a headliner opening to view it.
Looking aft into that opening, with the tube visible.
~~~~~~~~~~~~~~~~~~~~~~~~~~~~~~~~~~~~~~~~~~~~~~~~~~~~~~~~~~~~~~~
A bit more time to attach the belts to the floor mounts and remove the OEM shoulder shoulder straps, clean up and vacuum, put the co-pilot's seat back in (it makes it a lot easier to remove it), and job all complete. Had the plane in the maintenance hangar by 9:30am or so that morning, took an hour for lunch, and washed our hands about 6:30pm.
One thing left to do, and that is to repair the T cuts in the headliner in the rear. Might create a small plastic panel, screw it in to the C channel and cover these, make it look like it belongs, or maybe just tape together the fabric. It is well back, and not very visible.
Was it worth it?
ABSOLUTELY. The BAS seatbelts are outstandingly comfortable, you hardly feel them on. There is also no doubt in my mind they would do a better job in keeping my head away from the panel and the yoke.
I did go the extra mile, and got the rotary release buckles. They are very nice.
Got the STC'd product from BAS, they use industry standard Amsafe mechanisms. I loved them initially, and still find them top notch. They have worn well, and remain comfortable and secure. Highly recommend them.
http://basinc-aeromod.com/piper.php
The full (old) post is below. Since then I've had the interior redone, so the old headliner holes (and gaudy orange velor!) are gone, and not an issue any longer.
* Orest
=========================================================
Well, got it done last week. It was a chore for sure, but the fruit of the labor is very heartily being enjoyed now.
Really didn't want to to drill/cut/maim the fabric or aluminum incorrectly, so we went slowly and carefully. That is not to say that the diagrams and text were lacking, they were pretty complete, but measure twice, thrice or more, and then cut.
The first cut in the headliner, and the insulation excised to make room for the retension spool. 

I really cringed to see the ugly hole in the otherwise spotless headliner, but nice to see the healthy aluminum underneath.

The next step is to make room for, and then rivet in the vertical plate that will hold and anchor the horizontal plate that will actually support the mechanism.
On the co-pilot's side there are two rivets that have to be removed in the "C" channel, they are exactly in the way. Two holes are then drilled into the bottom of the C channel, and the vertical plate temporarily fixed with the screws against the riser portion of the C channel. Then you need a 90* drill (you really do!) to make the holes for the rivets.
Looking forward into the opening, this step now 2/3rds complete.

And done.

A closer look.

The next step is really the hardest and most frustrating. You have to blindly fish a long flat rod through the insulation above the headliner, in our case past an extra strengthening beam as well, and then catch it with a screw screwed in from the outside through an opened up rivet hole.
Removing the rivet was fairly easy, but it says to use a rivet hole 4" in from the outside beam. It seemed more logical to use the one 2" in, as it was directly in line with the seatbelt mechanism. We did as directed though, and I think the reason for this slight angle is so the vector force is directly parallel to the line made by your body, the mechanism, and the anchoring point.
It says to fish the rod in and use a magnet to hold and move it into position. We wasted an hour fiddling with this, my suggestion, don't bother! We finally decided to cut a neat hole in the pristine headliner (oh!), but it made that step much easier. I suppose if your aircraft does not have any insulation, and does not have the extra beam in between, that might have worked, but otherwise it is a real bear.
Did about a 3" T-cut, and then taped the flaps back. Here is looking aft, into the opening, the rod in place, the insulation compacted, rivet-nut ready to accept the screw passed in through the fuselage rivet opening above.
The rod is temporarily anchored in.

Back to the front, the horizontal plate is screwed into place so that you can measure and drill a hole in the rod exactly to size.

Now with that hole drilled, and the rod back in place, and the mechanism mounted on the plate.

We forgot one step, to place the plastic top plate to protect the headliner from friction from the belt, corrected that later.
One other issue, the pre-drilled holes in the plate were extremely difficult to thread the screws through even after the enlargement suggested. We gingerly opened them up a bit more, but not so much that the screws would not be firmly held. I suppose the tight fit keeps them from backing out.
One of the two screw holes in question.

The anchoring screw from the outside, once finally secured, we sealed with some compound to waterproof it. Also sealed the original anchoring screw, after screwing it back in, that held the OEM shoulder belts in place -- after removing those.
Ta da! One side done.

The first side took us some six hours. A lot of that was scratching our heads a bit, and rereading things, mostly just plodding.
But, armed with that experience, the pilot's side took only 1-1/2 hrs!
The claims of a two hour install for a naive installer is not creditable, but I can see that someone with an install or two under their belt, could well complete the full job in 2 to 3 hrs.
The pilot's side had a couple of extra nuisances.
Although there were no rivets to remove in the C channel on the pilot's side, there was a bundle of wires exactly in the wrong place.

We just cut those wires and pushed them aside -- NOT!
The second issue and obstruction was a small aluminum tube, the purpose of which I don't know, but it may be a protection/guide for some antenna wires.
It was exactly in the "wrong place" as well, made maneuvering the rod into place in the rear, and mating it to the roof top screw a devil of a task, even with a headliner opening to view it.
Looking aft into that opening, with the tube visible.

~~~~~~~~~~~~~~~~~~~~~~~~~~~~~~~~~~~~~~~~~~~~~~~~~~~~~~~~~~~~~~~
A bit more time to attach the belts to the floor mounts and remove the OEM shoulder shoulder straps, clean up and vacuum, put the co-pilot's seat back in (it makes it a lot easier to remove it), and job all complete. Had the plane in the maintenance hangar by 9:30am or so that morning, took an hour for lunch, and washed our hands about 6:30pm.
One thing left to do, and that is to repair the T cuts in the headliner in the rear. Might create a small plastic panel, screw it in to the C channel and cover these, make it look like it belongs, or maybe just tape together the fabric. It is well back, and not very visible.
Was it worth it?
ABSOLUTELY. The BAS seatbelts are outstandingly comfortable, you hardly feel them on. There is also no doubt in my mind they would do a better job in keeping my head away from the panel and the yoke.
I did go the extra mile, and got the rotary release buckles. They are very nice.
Last edited:


